Video Transcript
This video’s full transcript has been provided below for your convenience.
Good day, it’s Mike from FlexRadio and this video is designed for the new Flex user and how to adjust and set up these microphones. In the beginning part of the video, I’ll show you a bit of the hardware and microphones and cables. The middle part will go through SmartSDR and the settings for those and near the end of the video, a quick tour of the 6400M and the 6600M and how to adjust your microphone with those devices. So stay tuned, here we go.
Featured Products


This is the Flex hand mic (FHM-3 Hand Mic) that comes with your 6400 or your 6600. You’ll notice that there’s two connectors on it. It has a one-eighth-inch TRS connector, that’s what that’s called and that’s this right here and then the other connector, the RCA connector, which goes to the push-to-talk port on the back of your radio.
Now if you look at the back of your radio and this happens to be the 6600M, you’ve got a couple of connectors that are really key. For the hand mic, the only one you need to be concerned about is the mic connector right here, and the push-to-talk connector right here. That’s what the hand mic plugs into and that’s if you had some other microphone where you would likely connect that. One little step if you were getting into a bit more advanced microphones, maybe you were coming from a mixer or you wanted to deal with a balance microphone that would come in here and that’s that connection. So there to the back of the radio setup, just for hooking up your hand mic.
Now let’s have a look at the back of the Maestro. The feet have been removed for this picture but we have two mic inputs on the back. We have the mic one where the mic with the RJ45 connects and mic two, where a computer style of microphone connects. Now mic two is sort of special, I just want to make you aware of this, that if you plug a microphone in there, you can have the radio go into transmit and there’s a software setting you can change to turn that mic to push to talk off. Push to talk is here, these are all one eighth inch connectors and you may need an adapter if you’re going to a foot switch to an RCA connector or a quarter-inch adapter, and those are pretty common and easily found and we have them of course, in our store.
So that’s mic one, mic two, and your headphones would plug in here and your powered speakers would plug in there for a set of computer speakers or something like that. This is the hand mic that is available for the Maestro. It doesn’t ship with the Maestro, but you’ll notice this microphone has an RJ45 connector on it. Now, should you just want to buy a cable, we have these in the store. You can buy the cable. It goes from here to here and just move your hand mic around as required. We also have the complete mic assembly available in the FlexRadio store. If you happen to be using SmartSDR, let’s look at how you adjust your microphone and there’s a couple of key things. Most of them are controlled on this panel on the right. If that panel happens to be missing, you can click this little character in the bottom left, where it says “show or hide radio panel” and you’ll see it goes away and you can bring it back as you need it.
That’s pretty handy just to give you more panadapter real estate. Here’s the control panel for the microphone, and you can actually see that my mic level is bumping up and down. That’s a cool feature of the FlexRadio, and that’s the ability to set your mic level without even going into transmit. Now I’ve selected Flex hand mic two, it’s a default setting. We want to make sure that this value right here says microphone, that means we’re going to plug the mic into the microphone connector in the back. You might be using the balance connector if you’re using a different microphone solution. Line connector is a different audio path and really importantly, if you’re running PC because you happen to be sitting like I am on the PC, but I want to use the microphone on the personal computer and it will use the microphone which is labeled as the default sound device.
“So let’s talk about the speech processor… that’s what Controlled Envelope Single Sideband is all about.”
So be aware of that. And then if you’re running PC control, you need to click this on. It’s just something that you need to be aware of to make it work and hear things so we’ll turn that back off. So this control right here controls our mic gain and okay, I’m now holding it up and you’ll see that if I go all the way up, we’re way, way, too loud, and that’s not what we want so we want that top end peak bar, just to peak about almost touching the zero, maybe about halfway between the zero and the minus 10.
If you want to check some of the other settings, under settings, radio setup, Phone/CW, you’ll see the microphone. And the Flex hand mic does require BIAS to be turned on and if I turn that off like that, you’ll see the microphone doesn’t function anymore so we’ll turn that back on and it’s an immediate setting and then 20dB boost gives you 20dB and more mic gain. You don’t need it for this mic but you see what happens when I turn it on, we’re pegging the needle way over there, right here and you definitely don’t want that. And that’s in the radio setup.
[5:00]
So I’ve closed that and we want to quickly talk about the EQ. Oh, by the way, if it’s something you may or may not, no, but if you want to move your mic gain around, you can just change its position. Maybe I want it up here because I don’t use EQ. You can also take this whole window and pop it out over somewhere else and if we just close this, we’ll see now we’re only looking at the settings for the microphone and everything else. So let’s interpret how this works. If you’re not sure how an EQ graph goes, that means we’re going to increase the audio a little bit at 4kHz, 63, 125 and this is an 8-band equalizer.
This means we’re currently displaying the transmit equalizer and we have it turned on. If we click here, it’s turned off. And if we go over to the receive equalizer and we click there, it’s now turned on but it’s flat and this is a really powerful tool that you may or may not be aware of but if you were to take this and you say some person you were listening to sounds a little muddy or something, and you needed a bit more highs to understand him, you could drag these up a little bit and you’ll immediately hear the difference so it’s a great powerful tool for received audio as well. And that we turn the… And this is just a switch, either TX or RX EQ so you can see one or, or the other.
So let’s talk about the speech processor and that’s what Controlled Envelope Single Sideband is all about. It’s a peak limiting algorithm that’s used in sideband AM and FM modes and that gives us the equivalent of almost 3dB more RF power out by ensuring that we do not overdrive the radio, but we do everything we can to use up every ounce of the envelope where the voice signal is.
And this is why this sounds almost 3dB better. What does that mean? Well, it makes your 100 watts sound like 200 watts. It also makes your 1500 watts sound like 3000 watts. And so let’s have a look at those controls in SmartSDR and here’s the processor, normal DX and DX+ as outlined in the manual, which is the SmartSDR software manual and the one I was showing you was a version three manual. Wait a minute, it’s grayed out. You can’t do anything. Let’s look at this slice as an example, we’re in TX mode which was right. Oh, here’s the problem we’re using DGU, which is used for digital modes, digital upper sideband. The minute I flip that over to USB, we now have access to turn our processor on and off and adjust the impact of the Controlled Envelope Single Sideband. One key thing I should talk about in case you’re next trying to do some digital work is this DAX control controls the audio coming into the radio from the computer and the DAX utility we have that comes with SmartSDR.
I do discuss that in another video regarding how to set up WSJT and other digital modes so that’s what works for you there. So this is the main FlexRadio website, and we have a whole download area of documents and such and if you go to support and downloads, and that will load this table, it’s essentially FlexRadio.com/downloads should this page ever change. So you can go through here and what did I find the manual for SmartSDR? I found it here, under documentation and this is it and it changes as required for version three. We also have a great, a utility and search tool here that you can search on whatever you want. Let’s say it’s… Well, let’s say it’s SmartSDR. Let’s see what happens. And it actually automatically searches so we can see reviews and a whole number of items, which are quite useful.
Let’s say you wanted to know about the USB cables. Oops. Here’s the USB cable set, document PDF and that’s where we found all that information. So, looking at the SmartSDR manual which I referenced a bit earlier, you can, if you scroll down the index is incredibly good, but geez, I know sometimes it’s a bit overwhelming. I actually print this out. I go to a local print shop and for not very much money, they print it for me in black and white and put it in a nice surelock binder but if I want to find something I’m going to go CTRL F on my keyboard and just about every program like Acrobat or whatever does work on a CTRL F and I wanted to know about something like Controlled Envelope Single Sideband, let’s just say processor, because I want to know exactly how that works.
[10:00]
I can go like that and hit enter. And it’s there’s… Wow, there’s 23 hits but that’s okay. Look where you got into the index, operating a speech processor, it’s on page 90 but if I just click on that, it goes right to page 90, and then we can zoom in and read all about it so don’t hesitate to peek at the manual. I actually find it incredibly useful and incredibly well written. If we go back to the webpage and if you’re looking for any cables or accessories, if you go to the store, that’s this little cart but as I said, in case this page changes, you really just want to go to shop.flexradio.com and we’re into the store. Now there’s a pretty powerful search engine here too.
One of the adapters that we sell a lot of is the 8 Pin connector and if I go 8 Pin like that, we’re going to come up with this 8 Pin foster connector and this allows you to plug this right into the back of your 6400 or your 6600. It gives you an 8 Pin mic plug that’s wired in Yaesu format and if you have a Yaesu HF microphone, you can plug it right into the radio. So this is the other cable I referenced for you that you can use just to change the head of the cable and plug it into your Maestro or plug it into the radio. It’s a replacement coiled cord cable. It’s called the ACC-CLV-310. We have those in the store and that’s the price and you can just swap that out. It’s also great if you happen to break or wear out a cable.
We also have a number of different cables. If you’re from the XLR world, you type in XLR and we can see a number of them here. Let’s say you had some sort of AL or specialized microphone. You could plug the AL mic into this 3 Pin XLR and then this plugs into the mic connector on the back of the 6600.
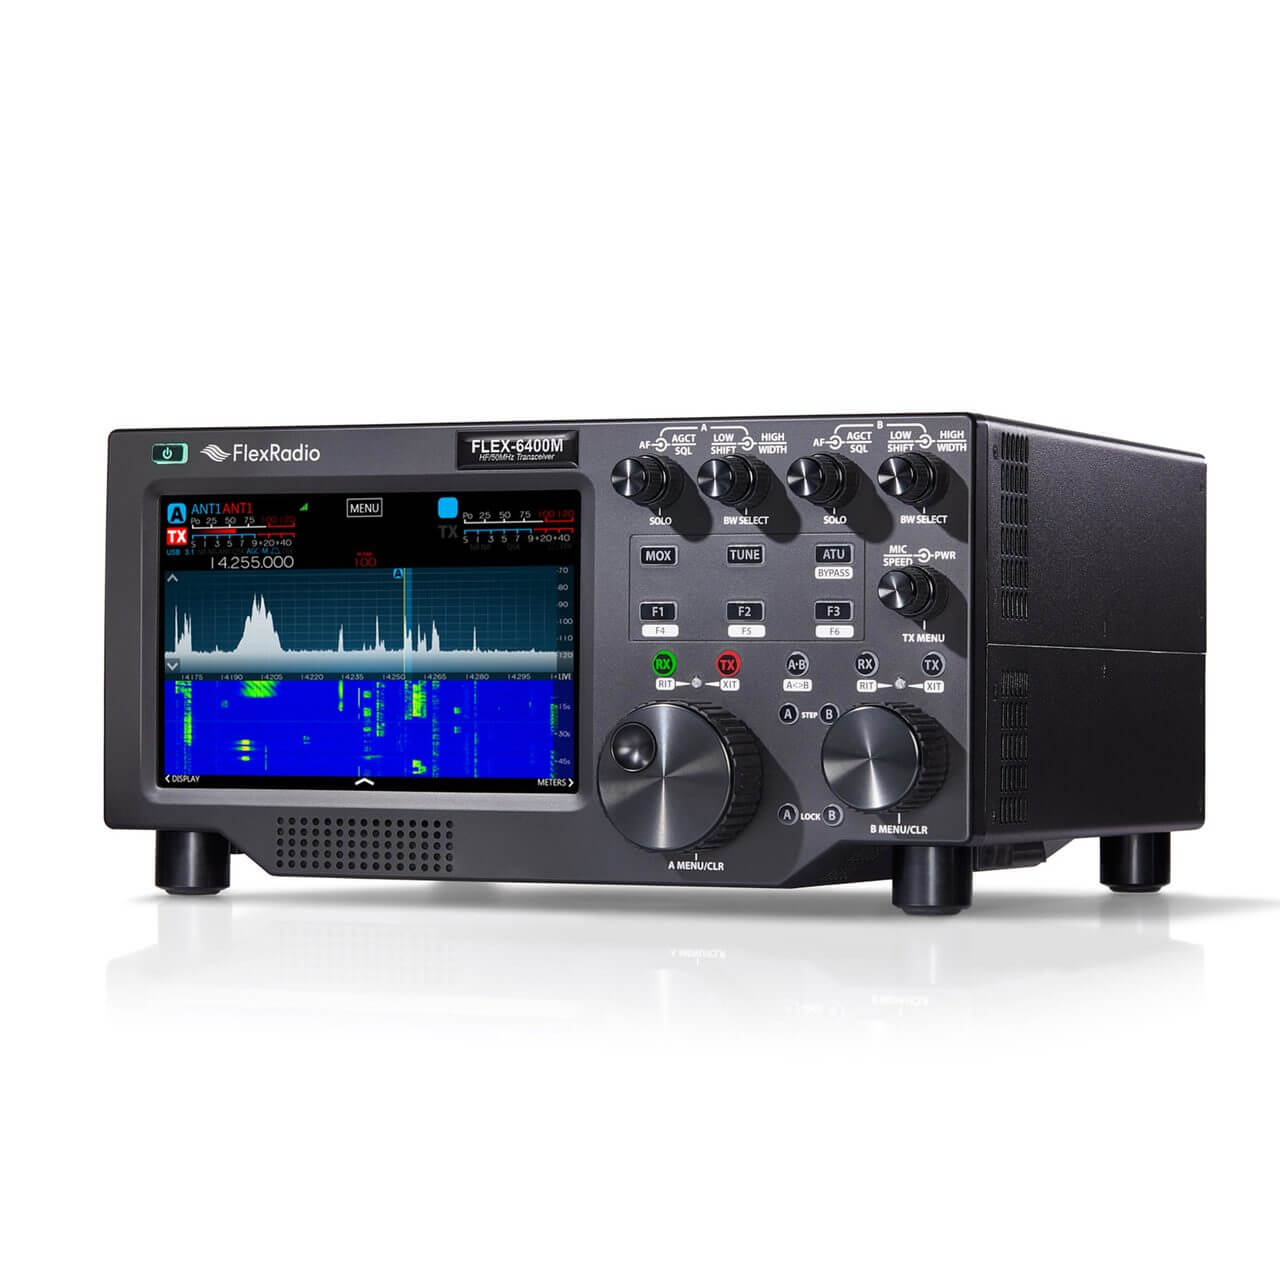
So let’s look at the Flex M model and how that plays. First off, we want to be able to find the basic controls for your microphone and that’s what this button here. This button has on the outside is your mic gain, you can see that moves up and down and the inside is your RF power. Pretty handy to have. If we push in on that button like that, we come up with this menu here and that has a lot of microphone controls in it so if we flip over to the emulator that I have on my computer screen, you’ll see that we have down the left hand side… You can now look at my mouse, we have the mic inputs. There can be the mic connector on the back of the M model, the balance connector because this is a 6600M, the line, and the accessory.
If this was a Maestro, you would see more and they begin with R or M. The M ones are the inputs on the Maestro, the R ones are the inputs on the actual radio. We have the processor here, which turns on and off Controlled Envelope Single Sideband, the monitor here so you can hear yourself while you speak, and then lastly, our mic profiles, you can drop them open here with your finger, pick the one you’re using and when you’re done you can save your profile. We’ll show you how to do that in a minute. And let’s go to Phone/CW and microphones either need bias or they don’t need bias and sometimes they need more gain and sometimes they don’t. I can never remember which mic needs bias or not, and you won’t hurt a mic by turning it on or off so if a mic does not work, then I’m trying to make function, I turn the bias on or turn it off then see if I’ve got anything in the mic metering which I’ll show you the mic metering in a minute.
If we go to transmit, we can see a few more things. And here is our EQ for our transmitter, we can turn it on or off just like UN SmartSDR. One other thing I want to talk about which can throw you for a bit of loop is multiFLEX. multiFLEX is the ability to have two people from two different clients and a client being a Maestro, SmartSDR, SmartSDR for iOS or dogparkSDR, or any other client that may be written in the future to have access to the radio at the same time.
So let’s tell a bit about profiles. Profiles are right here. You can pop that up. Let’s go to mic profiles right here. I can go over there, I can backspace my way into deleting that. I can type in a new name and save it. So we called it my new profile. You probably call it your call sign and my whatever mic I’m using so you can easily find it. This allows you to save the critical parts for the microphone. The TX EQ settings, by the way, are set and saved rather in a TX transmission profile, not a mic profile. So how do we set our mic gain?
[15:00]
Well, in case you don’t know by now, you can tap on these little meters and they’ll change to whatever you need. But the one we want for this exercise is level and just like in SmartSDR, we can talk 1, 2, 3, and that’s about where you would like your mic to peak just at that point.
As well, in case you’re not aware, we have more meters here, by the way, you can pop open the bottom right here and pick up all these extra meters. You can just add meters as required and change what they look like by tapping on them and if you had a PGXL, you get more meters. If you have any questions, feel free to email us at info@FlexRadio.com. Thanks very much, good DX73 y’all.